This article will take approximately 8 minutes to read. Don't have the time right now? No worries. Email the ad-free version of the article to yourself and read it later!
I just got back from a 10-day trip to Japan, and this time I decided to try something new. Instead of using international roaming from my local provider like I usually do, I switched to an eSIM. Specifically, I used Airalo.
I had tested Airalo once about a year ago, but this was my first time relying on it for an entire trip. If you are thinking about using Airalo for Japan, my experience should help you decide whether it is worth it.
Disclaimer: This article may include links to products or services offered by ExpatDen's partners, which give us commissions when you click on them. Although this may influence how they appear in the text, we only recommend solutions that we would use in your situation. Read more in our Advertising Disclosure.
Contents
Advertisement: Getting sick in a foreign country is never fun, and in Japan it can feel even more stressful if you don’t speak the language. From choosing the right clinic to explaining your symptoms, simple things suddenly become complicated. Air Doctor helps remove that stress by letting you quickly find and book verified English-speaking doctors nearby, whether you prefer an in-person visit or an online consultation.
TLDR
Airalo works exactly as you would expect from a data eSIM. The connection is fast and stable, installation is easy, and I had no major issues throughout the trip. It is going to be my go-to option from now on. You can use this link to buy it with a 10% discount.
Installation
Installation is very easy. It is much easier than when I first tried Airalo a year ago. Back then, I had to scan a QR code separately. Now, everything is done directly inside the app.
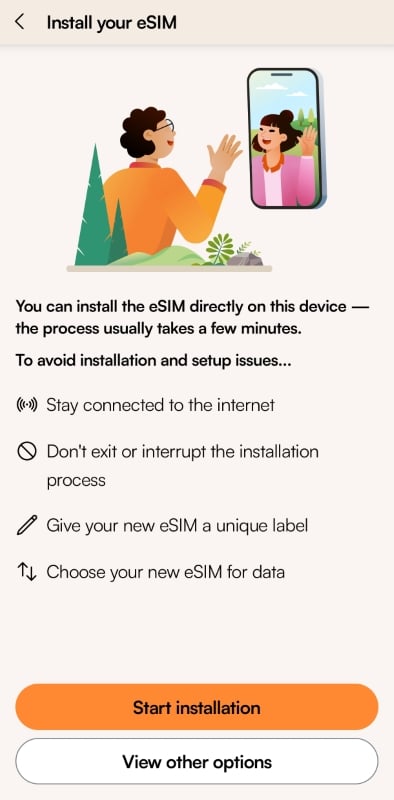
You just follow the instructions step by step, and the eSIM is installed within a few taps. One thing to note is that after installation, your phone will automatically switch to the Airalo eSIM. If you have not traveled yet, make sure you know how to switch back to your local SIM.
Activation
I installed the Airalo eSIM in advance before my flight. After installation, I switched back to my local SIM so I could stay connected before leaving.
Once I landed in Japan, I switched to the Airalo eSIM, and it connected almost immediately.
Tip: you need to turn on data roaming for the Airalo eSIM to access the internet.
Coverage
I spent nine days traveling around Tokyo and Lake Kawaguchi. I did not have any real connection problems during the trip.
There were a few brief disconnections here and there, but they only lasted a few seconds and were not an issue. I also lost connection when driving through long tunnels, which is normal. I have had the same experience with physical SIM cards as well.
Speed
I ran speed tests from time to time. On average, I got around 20 Mbps for both download and upload speeds.
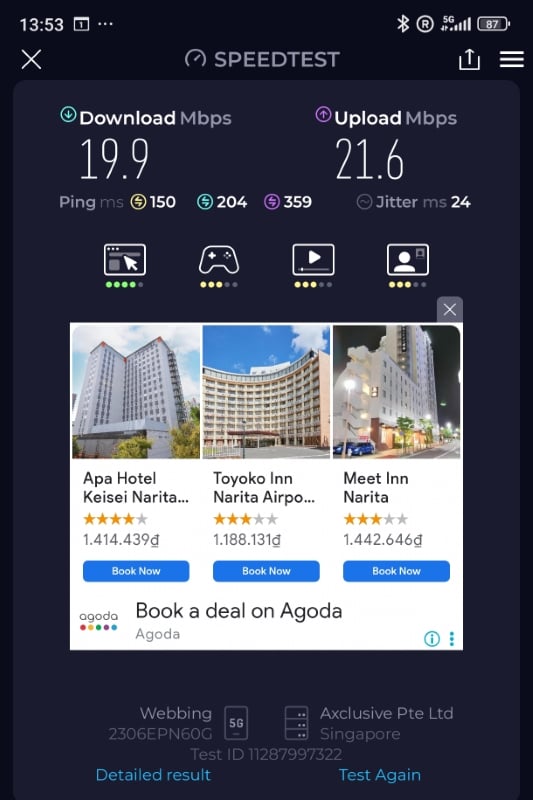
While that is not extremely fast, it is more than enough for normal use. I had no problem using Google Maps, searching on Google, checking Reddit and Facebook, or watching videos while on the train. Pages loaded quickly, and I never felt like I had to wait.
That said, I do not watch 4K videos on my phone, so keep that in mind.
Price and Data
I bought the unlimited plan during a Black Friday deal for US$26.25, which covered 10 days. For Japan, that is a very good price. Even though it is called an unlimited plan, there is a daily cap of 3 GB. After you reach that limit, the speed is reduced to 1 Mbps.
I never hit the daily cap. Unless you plan to tether your phone to a laptop all day or stream videos constantly, it is unlikely you will hit it either.
The price is also quite affordable. Even at the normal price of US$35, it is still much cheaper than unlimited data-only SIM cards from local providers, which usually cost around US$45. With Airalo, you can install it before your trip and start using it right after you land in Japan, saving the hassle of queuing to buy a SIM card.
In addition to the unlimited plan, there are many other plans and pricing options available. For example, their 15-day plan with 10 GB of data costs US$17.50.
You can see all of their plans with this link.
Data Tracking
Data tracking is one of the things I really like about Airalo. After installing the eSIM, you can check your remaining data directly inside the app. It is clear and easy to understand.
When I used roaming from my local provider in the past, I had to dial special codes to check usage. Airalo is much simpler.
Tip: sometimes you need to restart your phone after installing the eSIM for the data tracking to show correctly.

What I Did Not Like
There are a couple of things I did not like.
- Vietnamese in Search Result: First, sometimes when I searched on Google or tried to book activities on Klook or Trip.com, the results showed up in Vietnamese, with prices in VND. This might be because Airalo routes data through Vietnam, but I am not entirely sure.
- Data-only eSIM: Second, this is a data-only eSIM. You cannot make or receive phone calls using it. This can be inconvenient in some situations. For example, if you need to call your travel insurance company, you will need another option. When I rented a car in Lake Kawaguchi and they asked for a contactable phone number, I had to give them my hotel’s number instead. However, this is a main problem for most eSIM anyway, not just for Airalo.
Overall Experience
Aside from those two minor points, I am very satisfied with Airalo. It does exactly what an eSIM should do. The connection is reliable, installation is easy, and I did not run into any serious issues during my trip.

Will I Use It Again?
Yes. Not just for Japan, but for other countries as well. I also used Airalo in Hong Kong, and it worked well overall. The only issue I had was during installation, where I needed to change the APN settings based on instructions from their support team. Once that was done, everything worked fine.
Airalo is affordable, easy to install, and reliable. For me, that is exactly what I want from a travel eSIM.
If you want to try it, I recommend installing it in advance before your trip. Once you land at the airport, turn it on right away. If there is any issue, you can easily use the airport’s free WiFi to contact Airalo support and get it sorted quickly.
You can use this link to buy Airalo.